Hello, and welcome to my website!
I have made this website to serve as an online portfolio for my CV and other potential projects.
As someone who is constantly tinkering with computers, I found it was the smart thing to do to post projects of interest to a dedicated and private space for myself and interested parties.
Highly Available Pis
This website is powered by a cluster of Raspberry Pi 5 computers using the K3s kubernetes distribution, allowing for a scaleable and distributed website for optimal performance on low powered machines. The cluster has since been upgraded to a HA (High Availability) cluster with a cluster load balancer following the official K3s documentation. I wanted to do this so that if there was any failure on the cluster, the pods would “sort themselves out” as it were, and have normal operation continue without me having to interfere. Plus it was a great excuse to upgrade the cluster from Pi 4s to Pi 5s for extra computing power for my other applications. The cluster contains three master nodes as per the minimum recommended amount specified by the documentation, and two worker nodes. This allows for at least one master node to fail, as the master nodes need to maintain a “quorum” of two to make decisions.
This deployment is running a MySQL database in a StatefulSet configuration, and the WordPress application in a ReplicaSet config. This is combined with both deployments having their own Persistent Volume Claims in an nfs share ran from one of the master Pi nodes to ensure no data is stored solely on a single node, because why have a cluster where apps can bounce around if they need to be on a specific node to run properly?
This provides a stable database on one node. This can recover onto another if needed without worry of any data being left behind, as it will connect to the data path used by the previous instance. This is followed by WordPress instances, which can scale from a singular instance up to as many as the user (me) desires. This allows for high performance, as all traffic is routed through the MetalLB load balancer within K3s.

The ‘Bakery’ cluster up and running. This cluster contains a single Pi 4 (far left) as the cluster load balancer, and five Pi 5s in the K3s cluster.
Picture taken in the dark for full Pi and switch light effect.
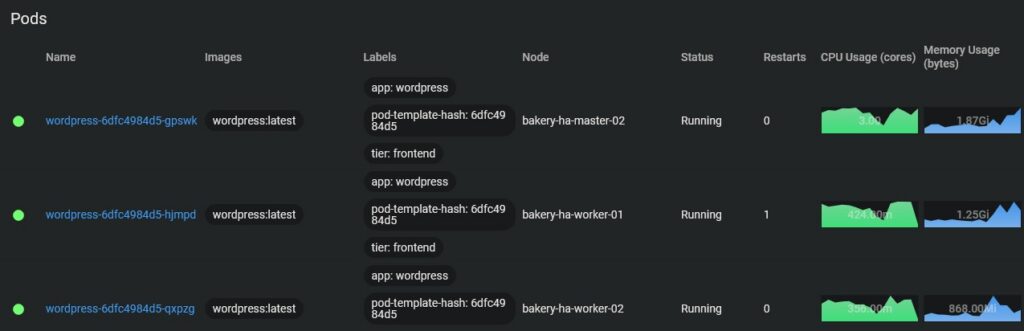
There are multiple ways to visualise this data that shows what the cluster is running. Here is an example showing all the pods in the ‘wordpress’ namespace.
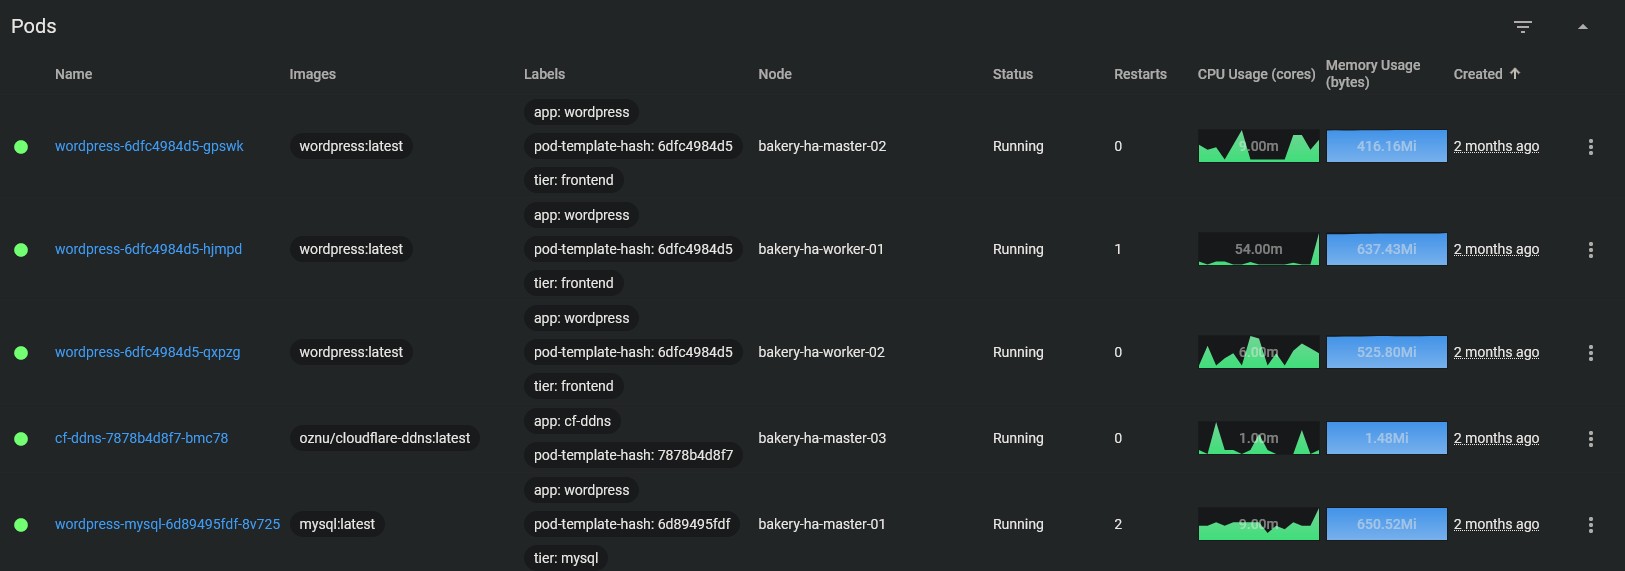

Above are the pods for the WordPress database and application across the five Pi computers: one from the terminal and the other from the kubernetes dashboard. This is presenting the same data — which pod is running on which node — but presenting it differently.
These pods have been configured in the YAML so that the MySQL database runs on one of the master nodes, whilst the WordPress application pods are allocated to both the worker and master nodes. The naming schema shows the name of the deployment, the replica set identifier, and the unique pod identity.
Cluster load balancing doesn’t actually mean that
When reading the documentation for the HA cluster, I saw that you could add a cluster load balancer (CLB) and my initial thoughts were “How cool, a dedicated device that can handle the traffic of the cluster! Fantastic, I have the spare Pis, I should add this!” Oh dear reader, how wrong I was on the actual function of what a CLB does.
A CLB does not actually load balance the cluster despite the name. What a CLB actually does, is balance the traffic from commands from people connecting to the cluster. Let me explain…
Due to the machines being right next to me on my desk, I typically SSH into one of the master nodes, and type my commands from there, straight on the hardware. However some folks aren’t as lucky and if you’re working for an organisation it’s more than likely going to be in the cloud, moreover as an organisation you can’t have everyone logging onto the node itself. What if it goes down and the IP changes? What if everyone logs onto one node and overwhelms it with traffic?
This is where a CLB comes in. The purpose of a CLB is to manage the traffic of those wanting to access the cluster and run commands. Say you have SRE having to run checks on the cluster, or a far more likely use-case, your developers running Git CI/CD pipelines to deploy changes and workloads to the cluster. The CLB handles all this traffic so that it’s taken away from the user.
Is this unnecessary for a home setup? Absolutely.
Is it cool and a good learning experience? Also absolutely.
Do I use this feature a lot? Nope.
To me… To you…
Hosting a website from your own personal kubernetes cluster is one thing, but how does someone (you) access information I have from my own private network? How does your computer know to point the domain frichardson.co.uk to my ‘Bakery’ cluster? Below is a diagram that shows the overall rough process and flow of information from your device to mine.
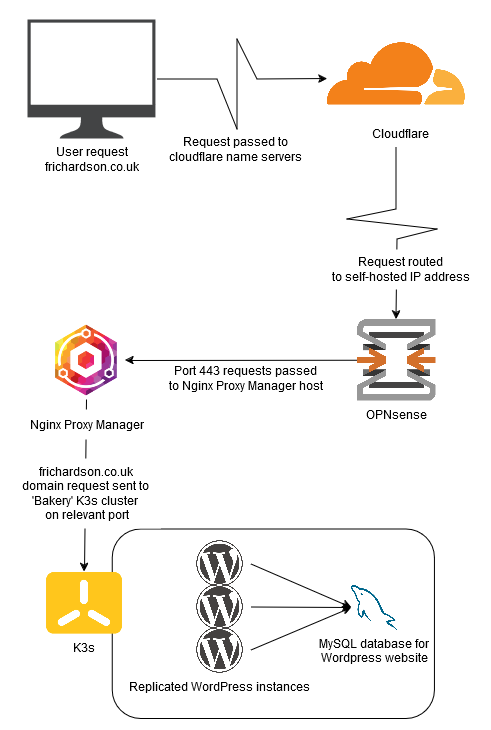
As the diagram shows, the request is pointed through Cloudflare’s name severs to the IP of this network. The request on port 443 is then sent to the relevant host, with Nginx Proxy Manager waiting to receive the request. Nginx Proxy Manager then sends this request to the relevant host on the relevant port. This system can be used to host multiple websites and services from within the same network.
Pressure? What pressure?
When it comes to offering online services, whether it’s a simple website such as this one, or incredibly large scale business websites such as Amazon, a question will inevitably come to mind. How much traffic can the website take?
In order to answer this question, you’re going to have to stress test your service(s) so you know what you’re able to handle. In the past I used Apache JMeter from my Windows PC which can be seen on the archived home page. However, for whatever reason, this software had a very buggy UI in Windows where graphical errors would occur.
Eventually, after just testing and trying new things, I found oha. Not only is this a nicer solution with an easy command line interface, it provides something that JMeter wasn’t giving me, graphs! Whether it’s performance metrics for my computers, or after the end of playing one of my favourite RTS games, one thing is for certain about me, I love a graph showing all the important metrics.
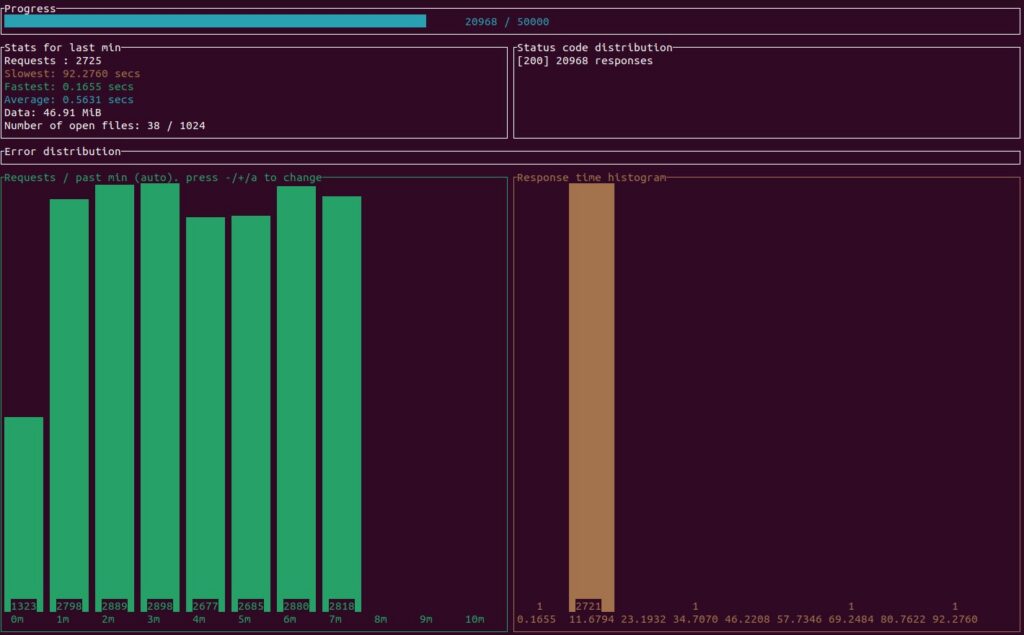
oha running a stress test for this website.
Oha is ran from my proxmox PC through a Ubuntu VM, a very convenient way to run this test as downloading this application onto Ubuntu is as simple as one command in the cmd, and running it is just as simple.
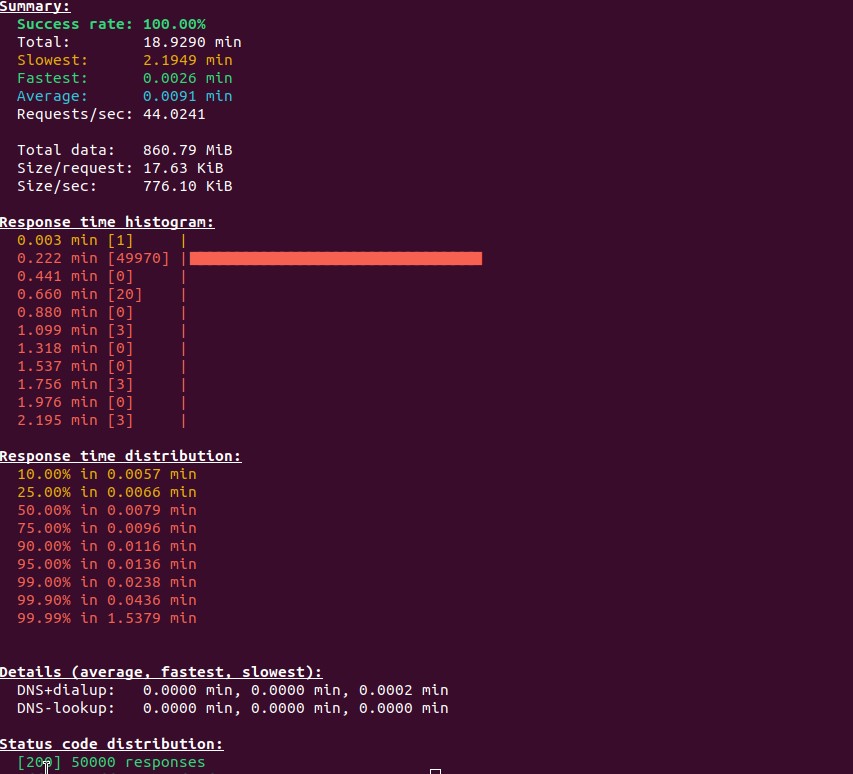
The results of the above stress test. Ignore the poor mouse placement.
Me and my Pis we got issues
As ever with computers, nothing ever seems to go 100% how you want it to go, and I still persist with teething problems with all technology. Sometimes I wish I stayed in the countryside and performed back breaking manual labour.
The key benefit of upgrading from Pi 4s to Pi5s is that all that extra CPU power really helps towards the load test. In my previous homepage, I declared that the Pi 4 “Bakery” could handle 150 requests per second through JMeter. I have to conclude that this was an erroneous measurement by myself, as through oha and actual logging, the Pi 5 “Bakery” with a similar distribution of three wordpress nodes and one database seems to top out at 60 requests per second with oha. So either oha sends requests in a different way to JMeter, or I was measuring incorrectly the first time around. I do not believe this can be the fault of the hardware, as the Pis involved in the test are fully utilised. I unfortunately cannot test the Pi 4 “Bakery” with oha, as it has been decommissioned and those Pis have been scattered to different projects, with one now being the CLB.
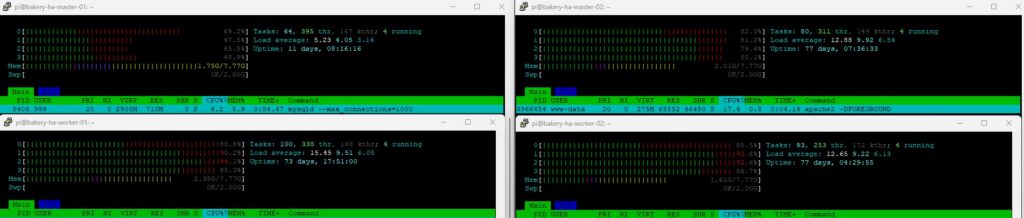
Bakery cluster at the mercy of the above stress test. DB in top left, WP instances on the rest
When running a particularly intensive stress test, the nodes running the WordPress instances tend to have an issue. One node in particular will often hog all the traffic for itself. I know it’s doing this because it has an abnormally high memory usage, and the CPU will also be higher. This can cause issues such as requests slowing down and unbalanced traffic. Obviously when website traffic becomes more intense, this is the one thing we didn’t want to happen. Looking through a LOT of Google searches, people seem to suggest it’s something within wordpress itself, and some sort of keep alive feature or “sticky sessions” feature needs to be disabled/toned down in a JSON file somewhere. Regardless, I haven’t figured it out yet, but I’ll get there one day.
master-02 showing much higher memory and CPU usage during a load test, something which I can only describe as “tomfoolery”
You can do it too!
We’ve reached the end, thank you for reading everything and going through all these concepts I’ve learnt with this project. If you’ve looked at this website and thought that you would like to try it out for yourself, here’s how you can do that. Everything I used/what you need will be in the list below. I hope you have fun with your future projects!
- One or more Raspberry Pi computers with 128GB SD cards and 8-4GB of RAM running 64bit Pi OS, along with a USB to SATA 3 cable, 240GB SSD, and PoE+ HAT. These can easily be purchased from The Pi Hut.
- New to kubernetes? This video from TechWorld with Nana is a great introduction to the concepts.
- K3s requirements, such as enabling cgroups on the Pi.
- K3s Quick-Start Guide.
- Github gist of YAML files for kubernetes deployment. Based off official documentation from kubernetes.io.
- Want to go high availability? Take the plunge and check out the offical K3s HA docs!